So, you’ve finally picked up a Rubik’s Cube and you’re staring at it wondering, “How on earth do people solve this thing?” Trust me, I’ve been there. When I first got my cube, I spent hours twisting it randomly hoping for a miracle. Spoiler alert: that doesn’t work! 😅
But here’s the good news — solving a Rubik’s Cube isn’t magic. It’s just a series of small, easy-to-follow steps. Once you understand the basics, you’ll be solving it in minutes, and your friends will think you’re some kind of genius.
In this post, I’m going to walk you through how to solve the first layer (white face) of a 3×3 Rubik’s Cube — step by step, exactly the way I learned it. Let’s dive in!
🧊 Quick Overview: What We’re Going to Do
Before we start, let me give you a quick idea of the plan:
- First, we’ll make a white cross on the bottom (we’ll actually build it on top first — I’ll explain why!)
- Then, we’ll match the edges with the correct center colors.
- Finally, we’ll solve the white corners to complete the entire first layer.
Sounds easy enough, right? Let’s get started!
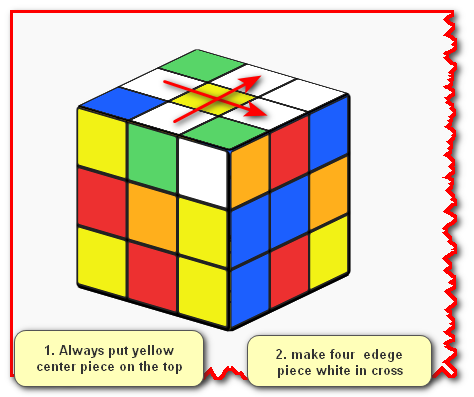
✅ STEP 1: Place the Yellow Center on Top of Rubik’s Cube
Here’s a little trick that beginners often miss — always start by holding the cube with the YELLOW center facing UP.
Why? Because we’re actually going to build the white cross on top first (since it’s easier to see what we’re doing), and then flip the cube later. The yellow center will always stay opposite to white, so this gives us a clear working space.
🎯 Rule to remember: Yellow center on top = White cross will form on top first.
✅ STEP 2: Make a White Cross on Top of Rubik’s Cube
Now, look around your cube and find the 4 edge pieces that have a white sticker on them. Edge pieces are the ones with 2 colors (not the corners — those have 3 colors).
Your goal is to bring all 4 white edges to the top face so they form a white cross (a “+” shape) around the yellow center.
At this point, don’t worry about matching the side colors yet — just focus on getting the white stickers to face upward in a cross pattern.
💡 Tip from my experience: Sometimes the white edges are hidden in tricky places (like at the bottom or sides). Just rotate the cube around and hunt them down one by one. Be patient!
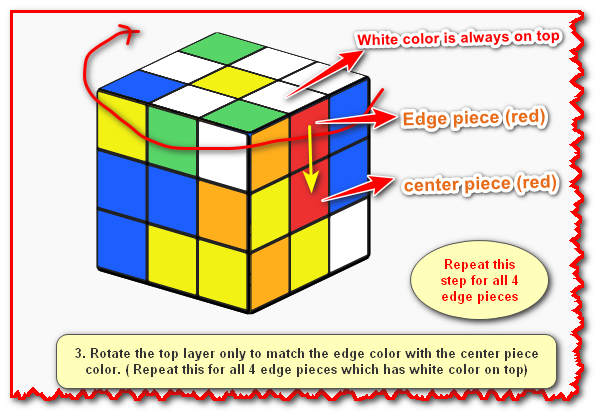
✅ STEP 3: Match the Edge Colors with the Center Colors
Okay, now here’s where it gets interesting. Your white cross is on top, but the side colors of those edges probably don’t match the side centers yet. We need to fix that.
Here’s how to do it:
- Look at any white edge piece on the top.
- Check its second color (the one on the side, not facing up). For example, let’s say the side color is RED.
- Now, rotate ONLY the top layer (U) until that red sticker is sitting right above the red center.
- Repeat this for all 4 white edge pieces until each one matches its respective side center (red with red, blue with blue, green with green, orange with orange).
🔄 In simple words: White on top, side color matched with the same-colored center below. This forms a “T-shape” of color when you look at each side.
After this step, your cube should look perfect from the top — a clean white cross with all four sides matching their centers.
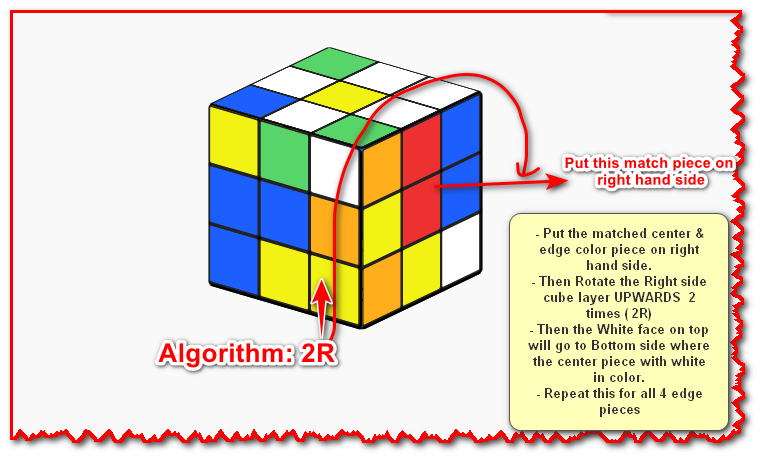
✅ STEP 4: Flip the Edges Down (Algorithm: 2R)
Right now, all the white edges are on top, but we actually need them on the bottom to start solving the first layer properly.
Here’s the move:
- Take any matched edge piece (where white is on top and the side color matches the center).
- Rotate the cube so that this matched piece is on the right-hand side.
- Now apply this simple algorithm: R2 (which means rotating the right side layer upwards 2 times, or simply a 180° turn).
What happens? The white sticker that was on top will now move to the bottom, and the side color will perfectly align with the center piece. ✨
🔁 Repeat this process for all 4 white edge pieces.
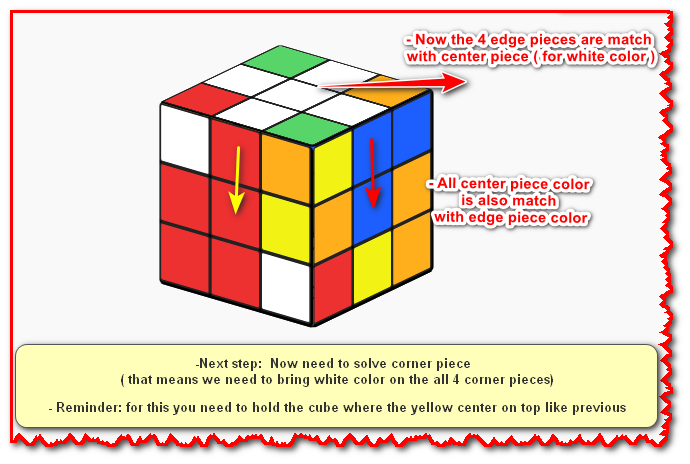
✅ STEP 5: Check Your Progress — White Cross is Done!
Now flip your cube and look at the bottom — you should see a beautiful white cross with all four edge colors perfectly matching their respective centers.
From the side, each face should look like this:
- White edge at the bottom
- Matching color in the middle (center piece)
- The rest is still mixed up — and that’s totally fine!
🎉 Congratulations! You’ve just completed the white cross — the foundation of solving the cube. Take a moment to appreciate this — you’re already ahead of 90% of people who pick up a cube!
Quick reminder before moving on: Keep the yellow center on top (don’t flip the cube). We’re now going to solve the white corner pieces, and we need the cube in this same orientation.
✅ STEP 6: Solve the White Corner Pieces of Rubik’s Cube
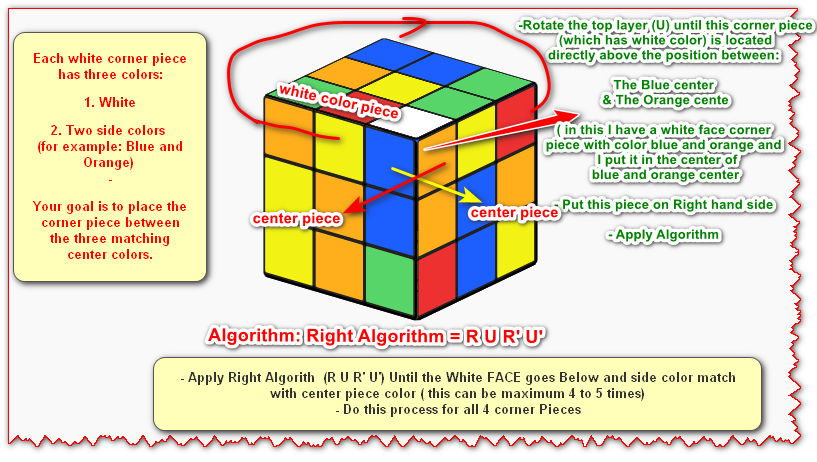
Alright, time for the final part of the first layer — the corner pieces. Each white corner has 3 colors:
- White (always)
- Two side colors (for example, Blue and Orange)
Your job is to place each corner piece between the three matching center colors. For example, the white-blue-orange corner must go between the white, blue, and orange centers.
Here’s exactly how to do it:
- Find a white corner piece on the top layer (yellow side).
- Check the two side colors of that corner. Let’s say it’s Blue and Orange.
- Rotate the top layer (U) until this corner sits directly above the spot between the Blue center and the Orange center.
- Now make sure this corner is on the right-hand side of your cube.
- Apply the Right Algorithm:
🔑 R U R’ U’
- Repeat this algorithm until the white sticker faces down and all three colors line up correctly with their centers.
⏱️ Don’t worry if it takes a few tries! Sometimes you might need to repeat the algorithm 4 or 5 times before the corner clicks into place. That’s completely normal — just keep going!
What if the white corner is stuck at the bottom in the wrong spot?
No problem! Just apply the R U R’ U’ algorithm once or twice — this will pop the wrong corner out to the top layer, and then you can re-insert it properly.
🔁 Repeat this entire process for all 4 white corners.
🏆 You Did It! First Layer Complete!
Once all four corners are in place, flip your cube over and take a look at the bottom — you should see a fully solved white face, and each side should have a complete row of matching colors at the bottom (like a “T” shape on each side).
This is a HUGE accomplishment. Seriously, the first layer is the hardest part to figure out on your own. From here on, it’s all about learning a few algorithms and repeating patterns.
📌 Quick Recap
Let’s quickly summarize what we just did:
Step What You Did 1 Held the cube with the yellow center on top 2 Made a white cross on top 3 Matched edge colors with side centers 4 Used R2 to flip white edges to the bottom 5 Confirmed the white cross is solved 6 Solved the white corners using R U R’ U’ ▶️watch video
🚀 What’s Next?
In my next post, I’ll show you how to solve the second layer (middle row) — and then we’ll tackle the trickiest part: the yellow face on top. Stay tuned!
If this guide helped you, share it with a friend who’s also trying to learn the cube. And drop a comment below telling me how long it took you to get the first layer done. I’d love to hear your story! 👇